Okotoks physio

Tennis Elbow

A Physiotherapists Guide to Treating Tennis Elbow

Are you struggling with pain on the outside of your elbow? If so, you might have tennis elbow!

Tennis elbow (clinically known as lateral epicondylitis), is a common overuse injury that affects the tendons and muscles in the outer part of the elbow. Despite its name, it can occur not only in tennis players, but also in individuals who perform repetitive arm movements, such as painters, plumbers, and even computer users.

Tennis elbow typically presents as pain and tenderness on the outer side of the elbow, which can radiate down the forearm. People experiencing tennis elbow often describe sensations of sharp pain on the outside of the elbow, numbness down the the top of the forearm, weakness through the arm when lifting things (like milk jugs or cups of coffee), and sometimes feel like their fingers are “stiff” or hard to move.

When people develop tennis elbow, they essentially have created small tears in the muscles and tendons that attach to the outside of the elbow. These mirco-tears will cause serious pain until they heal - which leads to the soreness that you feel with tennis elbow.

These small muscles on the outside of the forearm can cause major problems when they are injured. Simple things like typing at the computer is no longer possible. Pickleball or tennis becomes unmanageable. Even pouring a cup of coffee becomes a mountain of discomfort to overcome.

Having tennis elbow is not fun, but fortunately our team here at MOMENTUM Physical Therapy are experts and are here to help!


Before we go any further, let me introduce myself. My name is Stephen Uhrbach and I am a physical therapist at MOMENTUM Physical Therapy in Okotoks, Alberta.

Our team here at MOMENTUM Physical Therapy understands the frustrations that come with tennis elbow and we are dedicated to get you back to your best. We are known for providing personalized care to help you recover swiftly and effectively.

In this blog post, we'll dive into how MOMENTUM Physical Therapy can use tailored physical therapy techniques to assist you in overcoming tennis elbow and getting back to doing what you love pain-free.

Let's start off by walking our way through helping you heal your tennis elbow.


Step 1: Reduce Your Pain

Having pain is miserable. The first step in your recovery is to reduce your pain. How do we do this?

  1. Heat and/or ice

  • Using heat or ice depends on how new the tennis elbow injury is.

  • If you recently injured your elbow (think less then 10-14 days ago), you will be looking to ice the elbow. In this case, the injuries to the outside of the elbow are fresh and we are looking to manage swelling. Use an ice pack with a damp cloth between the skin and the ice pack for 20 minutes a time 2-3 times per day.

  • If your elbow injury is a little older in nature (think >14 days ago), heat will likely be your best friend. In this case, the inflammation is usually reduced in the elbow and we need to increase blood flow to the injured tendons to promote healing.

2. Bracing

  • You can purchase an over the counter tennis elbow brace. These braces are designed to help take the load off the injured tendon to allow it to rest and heal.

  • NOTE - wearing a brace for longer then 2-4 weeks is not recommended as the arm will become dependent on the brace. The goal of the brace is to rest the injured tendon for 2-4 weeks to allow it to heal.

3. Resting

  • Taking a break from whatever injured your elbow is necessary. Too much pickleball, tennis, computer typing got us into this elbow pain mess, so taking a break from it in the short term is necessary. The length of break that is required is dependent on the severity of the injury but can range from 2 to 12 weeks.

Step 2: Reset Your Elbow Muscles

Once your elbow pain has reduced, it is time to begin healing the muscles.

To get a head start on rebuilding your elbow strength, there are a number of exercises that we use at MOMENTUM Physical Therapy to help promote healing through the tendons on the outside of the elbow.

Here are two exercises to get you started:

  1. Eccentric Wrist Extension

Eccentric exercises involve lengthening a muscle while it's contracting. These types of exercises have been shown to be clinically beneficial for tendon-related injuries, like tennis elbow. Wrist extension exercises target the extensor muscles of the forearm, helping to strengthen and heal the injured tendons.

How To:

  1. Sit on a chair with your forearm supported on a table, palm facing downwards.

  2. Hold a light weight (such as a dumbbell or a can of soup) in your hand, with your wrist slightly bent.

  3. Slowly extend your wrist by lifting the weight upward.

  4. Then, lower the weight back down towards the ground in a controlled manner, taking around 6-8 seconds for this phase.

  5. Repeat for 10-15 repetitions for 2-3 sets, gradually increasing the weight as tolerated.

  6. Fatigue is ok, pain is not. Modify your reps and sets accordingly.

2. Forearm Extensor Stretch

Stretching exercises are used for improving flexibility, reducing muscle tension, and promoting blood flow. The forearm extensor stretch specifically targets the muscles and tendons on the outer part of the forearm, offering relief from tennis elbow pain.

How To:

  1. Extend your affected arm straight out in front of you, with your palm facing down.

  2. Use your other hand to gently bend your wrist downwards, towards the floor, until you feel a stretch along the outer part of your forearm.

  3. Hold the stretch for 15-30 seconds, ensuring it's gentle and pain-free.

  4. Relax and repeat the stretch 3 times, aiming for a total of 3 sets.

Step 3: See a Physiotherapist

Ready to kickstart your healing from tennis elbow? Seeing a Physical Therapist at MOMENTUM Physical Therapy in Okotoks will help speed up enhance your recovery journey. Tennis elbow recovery can be slow, so getting some professional help can speed up the process as a whole.

At MOMENTUM Physical Therapy, we recognize that each individual's journey to recovery is unique. Our skilled therapists employ a multifaceted approach to address tennis elbow, tailored to meet your specific needs and goals.

Here's how physical therapy can aid in your healing process:

  1. Pain Management:

    • Managing pain is often the first step towards recovery. Our therapists utilize various techniques such as manual therapy, cupping, electrical stimulatiuon, or kinesiotaping to help enhance the pain reduction phase. There are additional exercises, depending on your presentation, that can help alleviate pain and reduce inflammation around the affected area.

2. Healing Promotion:

  • Kickstarting the healing process can help stimulate the body to speed up the healing process. Our physios use techniques that include soft tissue release, IMS (intramuscular simulation) for tennis elbow, and joint mobilizations to up regulate the bodies healing.

3. Stretching exercises:

  • Restricted range of motion can make tennis elbow worse and actually slow healing. Through hands-on physical therapy, IMS (intramuscular stimulation) for tennis elbow, stretching, and range of motion exercises, we work to restore flexibility and mobility in the affected area. This facilitates optimal healing while preventing future recurrences.

4. Strengthening Exercises:

  • Weakness in the forearm muscles can contribute to the development of tennis elbow. Through targeted strengthening exercises, we aim to improve the strength and endurance of these muscles. This will first promote healing and then will transition to injury prevention as your pain resolves.

5. Injury Prevention Education:

  • In many cases, improper technique or repetitive stressors contribute to the development of tennis elbow. Our therapists provide education on proper body mechanics and ergonomics tailored to your daily activities, helping you prevent further strain on the affected tendons.

Ready. Set. GO!

Taken as a whole, seeing a Physical Therapist at MOMENTUM Physical Therapy in Okotoks can dramatically improve the speed and effectiveness of your tennis elbow recovery.

Don't let tennis elbow keep you sidelined from the activities you love. With personalized care and expertise from MOMENTUM Physical Therapy, you can overcome this condition and regain full function of your elbow. Contact us today by calling 1-403-982-5600, or book online here, to schedule a first assessment and take the first step towards a pain-free future.

Our award-winning team here at MOMENTUM Physical Therapy- in Okotoks, is ready to help! Give us a call today at 403-982-5600 to get booked in with one of our awesome physiotherapists, massage therapists, or trainers. Or feel free to book online HERE!

We’re here for you!

Frequently Asked Questions

What is the best thing to do for tennis elbow?

  • Healing from tennis elbow requires a multistage process that includes pain reduction (ice), activity modification (rest), tissue healing, and progressive strengthening. Seeing a physical therapist is the best way to navigate these phases.

Can physical therapy help with tennis elbow?

  • Physical therapy is an effective treatment form for helping you recover from tennis elbow. Physical therapists are trained to treat tennis elbow and teach you how to heal the injured tendons.

How long does it take to recovery from tennis elbow?

  • Depending on how injured your elbow tendons are, recovery can range from 2-12 weeks.

Meet our Registered physiotherapists:

Meet our Kinesiologists:

Momentum Physical Therapy, located in Okotoks, Alberta, is ‘Here for YOU’.


If you are experiencing neck pain, have recurring headaches, or you just want to learn more about how massage therapy and physiotherapy can help heal your pain, don’t delay and call MOMENTUM Physical Therapy today. You can reach registered physiotherapists and massage therapists at MOMENTUM, located in Okotoks, by calling 403-982-5600. We look forward to helping you feel you best again.

Pickleball Warm-Up

5 Essential Warm-Up Exercises for Pickleball Injury Prevention

Are you worried about being able to get in and out of the kitchen without pulling a hamstring? How about being able to move swiftly to pull off the perfect dink shot? Or even, will your shoulders hold up to the routine smashes you are known for delivering?

Pickleball is a fast-paced and engaging sport blending elements of tennis, badminton, and ping-pong. This growing sport has been capturing the hearts of players of all ages and skill levels worldwide.

At MOMENTUM Physical Therapy in Okotoks, we have seen a dramatic uptick in pickleball injuries that we are treating in the clinic. Through our sessions, we have found that most of these injuries are the result of players jumping straight into a match without properly warming up.

Whether you're a seasoned pro or just discovering the joy of this addictive game, preparing your body before jumping onto the court is essential for preventing injuries and optimizing performance. In this blog, we'll review five dynamic exercises designed to prime your muscles, enhance your agility, prevent injury, and elevate your pickleball game to new heights.

Before we go any further, let me introduce myself. My name is Stephen Uhrbach and I am a physical therapist at MOMENTUM Physical Therapy in Okotoks, Alberta. At MOMENTUM, our clinic is full of picklers - both clients and staff members alike!

Below, you will find 5 warm up exercises that you should do prior to hopping on the pickleball court that will reduce your change of getting injured (and ending up in treatment with one of our physical therapists or massage therapists).

This warm up should take 8-10 minutes in total to complete. An ounce of prevention is worth a pound of cure!

You will notice that there are no stretches - the goal is to get the body warmed up and moving. If you want to stretch - stretch AFTER you finish your final pickleball game. Research shows that too much stretching before you play a sport actually leads to injuries (rather than prevents it).

You will not need any equipment to complete the warm up. Simply show up 10 minutes prior to your first match and get your body ready to move! 

Let’s get to it!

1. Pickleball Warm-Up: Light Jog

A light jog is a dynamic movement that is an effective way to elevate your heart rate, increase circulation, and warm up your muscles before engaging in more vigorous activities. A light jog does not need to be vigorous or long, simply it needs to be done. All you need is a space to jog (along the sidelines of the courts, on a track, or along a sidewalk if you are playing outdoors).

Sets: 3

Duration: 30 seconds

The How To:

  1. Start Moving: Begin by standing with your feet shoulder-width apart and your arms relaxed at your sides.


  2. Take Off: Push off gently with one foot and start jogging, keeping your strides light and controlled.

  3. Maintain Pace: Find a comfortable rhythm, swinging your arms naturally as you jog.

  4. Keep Going: Continue jogging for 30 seconds, focusing on your breathing and staying relaxed.

  5. Stay Consistent: Try to maintain a steady pace throughout the duration of the exercise.

  6. Slow Down & Repeat: Slow your pace gradually as you approach the end of the 30 seconds. Walk for 30 seconds. Repeat this process 2 more times.

Overall, a light jog is a great way to warm up the muscles and awaken the nervous system before starting your pickleball match.

2. Pickleball Warm-Up: Arm Swings

Efficient shoulder movement is paramount in pickleball. Accurate serves, overhead smashes, and everything in-between requires well oiled shoulders. A dynamic warm-up targeting the shoulder muscles helps lubricate the shoulder, activate the muscles, and reduce the risk of strain or injury.

Sets: 3

Duration: 10 movements each direction

The How To:

  1. Get Set: Stand tall with your arms extended sideways.

  2. Start Moving: Make slow, controlled circles with your arms, gradually increasing the range of motion. Perform 10 circles.

  3. Change Direction: Repeat with 10 circles backward. Repeat 3 times.

Overall, arm swings are an important in awakening the muscles of the rotator cuff and to set the shoulders up for success.

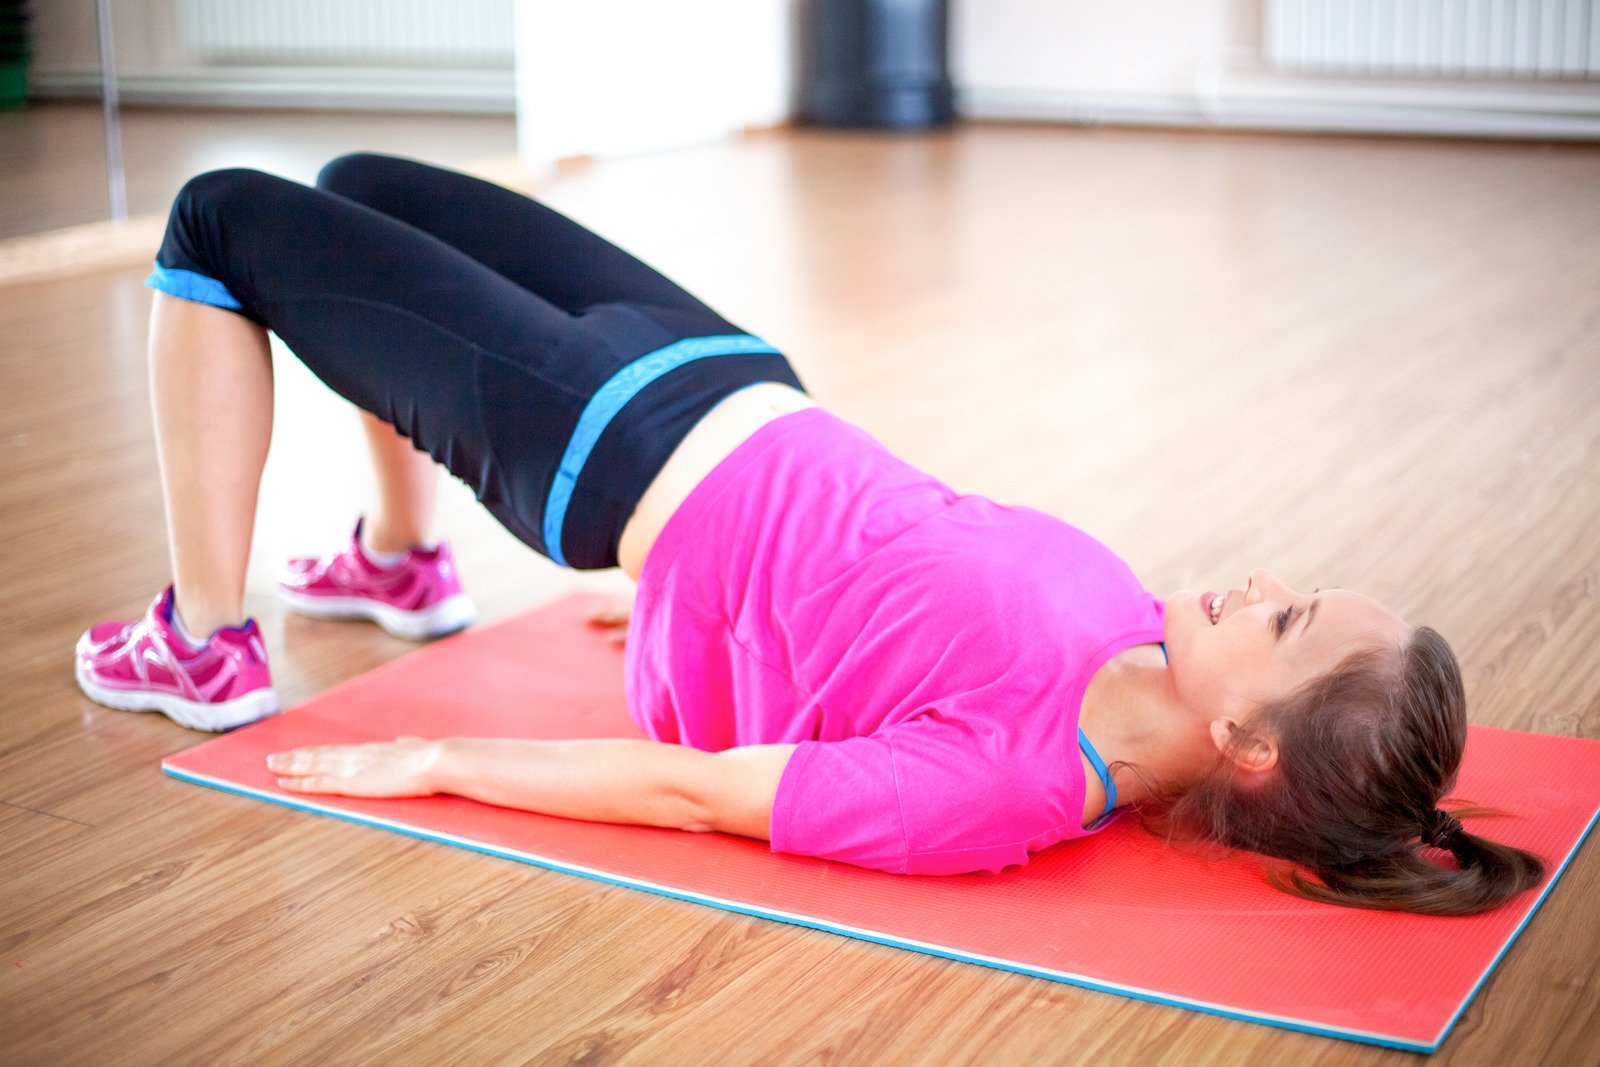
3. Pickleball Warm-Up: Bridges

Core activation is essential for any racket sport. The ability to stabilize the core will allow you to move your body efficiently while generating powerful shots. Bridges are the best exercises to wake up the hips and core.

Sets: 2

Reps: 15

The How To:

  1. Get Set: Find a place to lay down on the ground. A mat is optional (and only for comfort). Lay flat on your back, hands by your side, knees bent, and both feet flat on the ground.

  2. Engage the Core: Tighten your stomach muscles (as if you were about to be punched in the stomach or tickled).

  3. Clench Your Glutes: Squeeze your glutes together as if you were holding a $100 bill between your butt cheeks.

  4. Lift Your Hips: Up off the ground in a controlled fashion while keeping both feet flat on the ground. Hold for a count of 3 at the top.

  5. Slowly Lower: Keeping your core engaged, slowly lower your hips to the floor and repeat 14 more times before taking rest.

All in all, bridges are an essential for waking up the hip and core muscles required for pickleball.

4. Pickleball Warm-Up: Air Squats

Air squats are an important exercise for warming up the leg muscles. Squats can be done in an open space, beside a wall for support, or in front of a chair for safety.

Sets: 4

Reps: 5

The How To:

  1. Get Set: Standing tall with your feet hip width apart, toes straight forward, and core engaged (again, tighten those stomach muscles like you did for the bridge).

  2. Slowly Sit Back: Sit as if you were sitting down towards a chair. Don’t let your knees collapse inwards. Note - if you are concerned about your balance, make sure you are squatting down to a chair or while you are holding onto a wall or a table.

  3. Get Low: Go as low as you feel safe without needing to stop or take a break. Pause at the low point for a count of 2. Stand back up to the starting point. Repeat 4 more times and take a break.

Completing the air squats will allow you to awaken your lower leg muscles so they are ready for the quick movements associated with pickleball,

5. Pickleball Warm-Up: Lunge Walk

Lunging is an essential movement for any racquet sport. Your final warm up exercise will prime your body for lunging as you reach for those corner or dink shots.

Sets: 3

Reps: 10

The How To:

  1. Get Set: Find an open space approximately 10 yards in length. If you are concerned about balance, find a 10 yard space along a wall or fence. Stand with feet side by side.

  2. Take a Large Step Forward: Start with your right leg. Your step should be large enough so you should be able to look down and see your big toe. Keep your knee in line with your foot at all times.

  3. Get Low: Slowly lower your left knee towards the floor. Go as low as you feel comfortable.

  4. Get Up: After you hit our comfortable depth, slowly rise up and return to your stance with feet side by side.

  5. Repeat: This time stepping forward with the left leg. Repeat for the duration of the 10 yard distance.

Getting the lower body ready to lunge and change direction is an imperative part of a successful pickleball warmup!

Ready. Set. GO!

Incorporating these five pre-pickleball exercises into your warm-up routine can significantly enhance your performance on the court while reducing the risk of injuries. Remember to listen to your body, maintain proper form, and adjust the intensity of the exercises based on your fitness level and individual needs. By prioritizing proper warm-up and preparation, you'll be ready to unleash your full potential and enjoy the exhilarating experience of playing pickleball all while working to reduce your chance of getting injured. So, lace up your shoes, grab your paddle, and get ready to dominate the pickleball court like never before!

Disclaimer - if any of these exercises or movements give you pain, move on and do not continue to perform the exercise. In these instances, it is worth consulting with a MOMENTUM Physical Therapy physiotherapist to receive treatment and resolve your pain so you don’t get injured while playing pickleball.


“…but what if I do get hurt?”

Then we’ve got you covered!

Unfortunately, injures do happen. If you feel like you have pulled a muscle, tweaked your shoulder, or irritated your lower back - WE CAN HELP!

At MOMENTUM Physical Therapy in Okotoks, we pair hands on physical therapy with individuated exercise plans to help you recover quickly from any injury you sustain. If you are sore while playing pickleball, call us today to connect with one of our talented physical therapists or massage therapists to start on your recovery journey today.

At MOMENTUM Physical Therapy, in Okotoks, we treat all kinds of pain. Our talented team of physical therapists and massage therapists have helped thousands of people with a wide range of pain and injuries. Reach out to us today at 403-982-5600 or online to book your appointment today!

So, here's your call to action: connect with a MOMENTUM physiotherapist today to get those hips feeling better! You'll be on the path to recovery in no time.


Our award-winning team here at MOMENTUM Physical Therapy- in Okotoks, is ready to help! Give us a call today at 403-982-5600 to get booked in with one of our awesome physiotherapists, massage therapists, or trainers. Or feel free to book online HERE!

We’re here for you!


Frequently Asked Questions

What are the best exercises for pickleball?

The top five physio exercises for pickleball are: light jogs, arm swings, bridges, air squats, and walking lunges. Check our this blog post for more information on how to do these physio approved pickleball exercises. 

Where can I play Pickleball in okotoks?

  • Indoor court: Okotoks Recreation Centre: 99 Okotoks Drive

  • Indoor court: Foothills Centennial Centre: 4-204 Community Way

  • Outdoor court: Bob Anderson Pickleball Courts: Wilson Park, 10 Wilson Street

What should i do if i get an injury playing pickleball?

MOMENTUM Physical Therapy has a whole team of talented physiotherapists who are here to help you recover from your pickleball injuries. Our team is familiar with the sport with many of our physios being active pickleball players! Reach out today to book in with an Okotoks physiotherapist at MOMENTUM Physical Therapy.

Meet our Registered physiotherapists:

Meet our Kinesiologists:

Momentum Physical Therapy, located in Okotoks, Alberta, is ‘Here for YOU’.


If you are experiencing neck pain, have recurring headaches, or you just want to learn more about how massage therapy and physiotherapy can help heal your pain, don’t delay and call MOMENTUM Physical Therapy today. You can reach registered physiotherapists and massage therapists at MOMENTUM, located in Okotoks, by calling 403-982-5600. We look forward to helping you feel you best again.

Physiotherapy for ACL Surgery

How To Get Through ACL Surgery

Have you heard about the dreaded ACL tear?  Maybe a loved one (or yourself) has injured this ligament.  Rehab for ACL is no easy feat, but can be successfully completed if done in the right manner.  Here at MOMENTUM Physical Therapy, in Okotoks, we LOVE rehabbing ACL injuries.  Consider this blog your Coles notes to understanding ACL injury and ACL recovery after surgery.


Before we jump in, I should introduce myself. My name is Stephen Uhrbach and I am a physical therapist at MOMENTUM Physical Therapy in Okotoks, Alberta. At MOMENTUM, we have been treating knee injuries and ACL tears for the last 10 years!  I am excited to share with you a glimpse into the physio process following an ACL tear.

So let’s get into the nitty gritty, let's discuss what the ACL is. 

The Anterior Cruciate Ligament (ACL)

The Anterior Cruciate Ligament (ACL) is the major stabilizing ligament of the knee.  The ACL is located deep inside the knee joint.  You cannot physically touch the ACL, it is best “felt” by a series of specific tests completed by a physical therapist or seen using a MRI.

OK, but how did I injure my ACL?

The ACL is often torn when the knee is either hyper flexed, hyper extended, or if the knee collapses inward.  When an ACL tears, people often hear a snap and then report a feeling of “unstableness” within the knee.  In the hours following the ACL tear, the knee will often swell (to the size of a large melon) and the knee will become painful and stiff.

ACL’s are torn either by contact (think knee on knee collisions) or non contact (think trying to pivot or turn too quickly).  

ACL injuries can occur in varying levels of severity ranging from minor tears (grade 1 tears) to complete tears (grade 3 tears).  Rehabilitation for ACL injuries vary depending on the severity of the injury. 

So, I think I’ve injured my ACL… now what?

The first thing to do if you think you have hurt your ACL is to get your knee evaluated by a physical therapist, such as our crew here at MOMENTUM Physical Therapy in Okotoks.  

At your first session, your physical therapist will evaluate the ACL to determine the severity of injury.  If the ACL has a minor injury (partial tear), physiotherapy will commence that day to heal your knee.  If your ACL appears to be completely torn, your physical therapist will begin treatment that day but will likely refer you to a knee specialist to determine your eligibility (and need) for knee surgery. 


Do all ACL Knee Injuries Require Knee Surgery?

No!  Not all ACL injuries end up in surgery.  Only ACL’s that are completely torn may require surgery.  This is why proper diagnosis is so critical in the early days following a knee injury.

So, after surgery will my knee be as good as new?

Well, kinda.  

When you have an ACL surgery, the surgeon re-creates your ACL by using another tendon from the body.  This tendon takes time to strengthen and become as strong as your original ACL.  This “maturation” process takes 12 months to occur and coincides with a structured physio process.  Without proper rehab, the knee will not return to full function and you could be left with a knee that feels unstable, weak, painful, or stiff.  This is why getting high quality physiotherapy is so critical after ACL surgery.

This was the case with a client of ours named Danica.

Meet Danica.

Danica is a 19 year old athlete from Okotoks who is an avid soccer player.  She plays defence on a competitive soccer team and exemplifies the characteristics of a lifelong soccer fanatic.

18 months ago, Danica was involved in a knee on knee collision in soccer that tore her ACL.  After a trip to her local MOMENTUM physical therapist in Okotoks, she was diagnosed with an ACL tear and sent to see a knee specialist who set up surgery.  

After undergoing successful ACL surgery, Danica came to us at MOMENTUM Physical Therapy to complete her rehab.  By dedicating herself to rehabbing her knee, Danica has fully rehabbed her knee and has returned to the soccer pitch.  She is ready to resume her career at college next year.  Without proper rehab and training, Dancia would not have been able to return to competitive sports. 

But guess what.  It's just not soccer players who tear their ACL’s.  Football players, BMX’ers, martial artists, badminton players, baseball players, and many, many others tear their ACL.  

Let's walk through the rehab process following ACL surgery that Danica underwent that allowed her to return to soccer,

Month One - post Acl surgery:

The first month following surgery is, in our opinion, the most important.  Failure to excel through the first month will prolong all the following phases of your recovery.  

Initially, you will be on crutches.  You will have stitches or bandages over the incisions on the front of the knee.  The knee will feel hot, stiff, and likely sore.  

Your goal for the first 4 weeks here will be to get the knee moving, get the swelling down, activate the thigh muscles, and get off the crutches.  We strive to have full knee extension (or the ability to straighten your knee) by the end of week 2.

Treatment throughout this month will involve:

  1. Hands on physio to loosen your leg muscles and get your knee cap moving


  2. Exercises focusing on activating your leg muscles and getting your knee bending and straightening


  3. Stretching exercises to regain your knee movement (especially if extension has stiffened up)


  4. Icing and taping to help reduce your knee swelling and pain

In this phase, expect to have the physical therapist working on your muscles and leg A LOT.  They are working to jumpstart the knee and get it moving!  

You can expect to be in physio twice a week for this first month.  Anything less may prolong your healing process.  

Months two & three - post acl surgery

The second and third month of your ACL rehab largely focuses on rebuilding strength and balance.  

In order to enter this block of physiotherapy, you will need:

  1. To be off crutches


  2. Have full knee motion (especially with extension!)


  3. Be largely be pain and swelling free


  4. Have good activity of leg muscles

In this phase, you will still be getting lots of hands-on therapy.  Your therapist will be continuing to loosen muscles in the leg (as they tighten up periodically) and breaking down any scar tissue that might have formed over the past month.  It is common to have some scarring over the incision sites of the surgery, but it is important to receive hands on treatment to break this scar down.  

Exercises in this phase will focus on building strength in the legs (hamstrings and quadriceps) as well as through the hips (glutes) and core!  You can expect to be doing exercises like squats, lunges, split squats, and deadlifts.  

Balance also comes into play in this phase.  Getting that knee confident on single leg exercises, bosu balls, and balance boards is so important.

You can expect to be in physio 1 to 2 times per week in this phase (depending on how your knee is feeling and how well your home exercises are going).

Months three through six - post acl surgery

The next block of treatment - between months 3 and 6 - is where the fun really starts to happen!

By now, your knee should be fully moving, really have minimal (to zero) swelling, be pain free, and starting to feel strong (because you just finished like 10000 squats over the last 3 months).*

*Not literally 10000 squats, just a lot.

If your knee is doing well, we start to reintroduce some low impact activities such as running and hiking (~3-4 months) and golf (~5-6 months).  

In this block, we push the strength further.  Squats and deadlifts get weighted.  Movements become more complex (lunging with weights and pulling sleds).  We are into a “super strengthen” phase.  We also begin focusing on plyometrics and rapid movements for our athletes.  

What are plyometrics?

Plyometrics are jumping and moving quickly! 

We work on jumping mechanics.  Two foot jumps, 1 foot jumps.  We are going airborne!  

In the same breath, the agility ladder comes out.  We want to make sure that you can move your feet quickly while keeping your knee in a good position.

What is good knee positioning?

Well,  at this point, we work to get the body used to handling weight while you are moving around quickly.  Mastering this is imperative so you don’t get reinjured, as many ACL tears occur when people simply cannot control their knee while moving fast.  

In this phase, you can expect to be at physio 1x per week or 1x every two weeks depending on your goals and activity level.

Months six - twelve - Post acl surgery

This last phase of rehab lasts the longest and is truly unique and specific to each athlete.  

We know that it takes 12 calendar months for an ACL to fully heal after surgery.  During this last 6 month block, you will be instructed to gradually return to your sport (with a plan, of course!) until you are 100% ready to fully return.   

Athletes and individuals who have lower impact activity needs (such as joggers, golfers, hikers, and riders) typically exit physio around the 8 month mark.  By this time, their knee is moving extremely well and they have all the strength and control that they need to meet the demands of their lifestyles (although we do recommend that they continue to strengthen their knee independently until the 12 month mark).

Other athletes who have higher impact activity needs (such as soccer players, football players, downhill skiers, and baseball players) will need to wait out the entire 12 month process before they return to competition.  

Determining when you return to full sport will be a conversation that you have with your physio based on your needs and sport.  Some athletes return to sports with braces (for extra protection and to prevent a re-injury) while others do not.

This phase of rehab is uber unique to each athlete but will focus on progressive strength development, increased movement confidence, and a return to pre accident level of activity.

Once you pass the 12 month mark (from surgery), your ACL is fully healed and you are back to 100%.  

WHOA - that was a lot of information.

And yes - we get that comment a lot when unpacking an ACL recovery pathway.  

Saying that, the process to recovering from an ACL surgery is a journey that has a successful outcome.  You simply need to know that in order to recover from you ACL surgery, you need a physiotherapist who is giving you:

  1. Hands on therapy


  2. Progressive exercises


  3. And a physiotherapy plan that is frequent and intense enough to allow you to meet your goals


So, what’s next?

If you’re looking to get back to feeling your best, consider trying physiotherapy!

If you are dealing with an ACL or knee injury - whether it requires surgery or not - give us a call at MOMENTUM Physical Therapy in Okotoks.  We would be happy to get your rehab going and get you back to whatever activity you are missing out on.  Give us a call at 403-982-5600.

At MOMENTUM Physical Therapy, in Okotoks, we treat all kinds of pain. Our talented team of physical therapists and massage therapists have helped thousands of people with a wide range of pain and injuries. Reach out to us today at 403-982-5600 or online to book your appointment today!

So, here's your call to action: connect with a MOMENTUM physiotherapist today to get those hips feeling better! You'll be on the path to recovery in no time. Book online here!


Our award-winning team here at MOMENTUM Physical Therapy- in Okotoks, is ready to help! Give us a call today at 403-982-5600 to get booked in with one of our awesome physiotherapists, massage therapists, or trainers. Or feel free to book online HERE!

We’re here for you!


Frequently Asked Questions

How painful is physiotherapy after an ACL surgery?

You can expect to have some soreness in the knee after your ACL surgery.  You will be sore from the swelling caused by the ACL surgery as well as at the site where the new ACL graft was harvested from.  Saying that, physiotherapy is effective at reducing muscle tightness, reducing knee swelling, and improving knee movement which will all reduce the soreness you feel.  

How long is ACL surgery recovery?

Regardless of the type of ACL graft that you have or your own level of fitness, complete ACL recovery takes 12 months.  Some athletes can return to sports of lower impact before 12 months (such as bike riding, running, and golf), but contact sports and high impact sports usually require 12 months of rehabilitation.

Will my knee be the same after ACL surgery?

After you have your ACL surgery, your degree of recovery will be dependent on how diligent you are with your physiotherapy program.  Individuals who seek treatment and progressively build knee strength, balance, and endurance can expect to have the best outcomes.  Most people return to near 100% normal function.

Meet our Registered physiotherapists:

Meet our Kinesiologists:

Momentum Physical Therapy, located in Okotoks, Alberta, is ‘Here for YOU’.


If you are experiencing neck pain, have recurring headaches, or you just want to learn more about how massage therapy and physiotherapy can help heal your pain, don’t delay and call MOMENTUM Physical Therapy today. You can reach registered physiotherapists and massage therapists at MOMENTUM, located in Okotoks, by calling 403-982-5600. We look forward to helping you feel you best again.

Neck Pain + Headaches

The Top Three Physiotherapy Treatments to Reduce Neck Pain + Headaches

With spring on the way (hopefully!), many of us have spent the last few months hovering over our computers with work or school as we wait for winter to break. Unfortunately, all this time spent indoors at a desk has allowed neck pain to really settle in. As a result, we have started to see lots of clients who are seeking physiotherapy and massage therapy at our clinic in Okotoks, MOMENTUM Physical Therapy & Sports Rehab.

Can you relate? Do you suffer from neck pain and/or headaches? If you, or someone you know, can relate please keep reading!

Many people don’t realize the connection between posture and neck health. In this blog, we'll explore how poor posture can be a major contributor to neck pain and headaches and offer some tips on how to alleviate these issues by diving into WHY you are feeling sore after sitting at the desk and WHAT you can do to help get rid of that nasty and nagging neck and headache pain.


Before we jump in, let me introduce myself.

My name is Stephen Uhrbach and I am a physical therapist at MOMENTUM Physical Therapy in Okotoks, Alberta. I lead a team of talented physiotherapists and massage therapists at MOMENTUM Physical Therapy in Okotoks, Alberta.  Everyday my talented team help treat people (like you!) with neck and headache pain.

The Anatomy of Neck Pain & Headaches

Neck Pain & Headaches Relationship:

To understand the relationship between poor posture, neck pain, and headaches, let's begin with an anatomy lesson. The human neck is incredibly intricate, comprising seven small bones (vertebrae) that support the weight of your head (which weighs around 10-12 pounds on average). When you maintain proper posture, these vertebrae are aligned correctly and the surrounding muscles and ligaments can do their job efficiently.

The Domino Effect:

Poor posture, such as slouching at the computer or while looking at your phone, disrupts this balance. When you slouch or strain your neck forward while working on a computer or desk, you will be adding stress and pressure to bones, muscles, nerves, and ligaments in the neck. Poor posture will force all of these elements to work harder then they are designed to - which can generate neck pain and headaches by increasing:

1. Muscle strains:

The muscles in your neck have to work harder to support the weight of your head when it's out of alignment. Over time, this constant strain can cause muscle fatigue, tightness, and discomfort.

2. Nerve compression:

Poor posture can also compress nerves in your neck, leading to a condition known as "radiculopathy." This can result in radiating pain down the arms and into the shoulders.


3. Reduced Blood Flow:

Slouching can restrict blood flow to the head and neck, depriving these areas of oxygen and nutrients. This reduced circulation can contribute to tension headaches.


4. Increased Stress on joints:

Poor alignment of the vertebrae can also accelerate the wear and tear on your neck's joints, potentially leading to chronic conditions like osteoarthritis.

The Vicious Cycle of Pain

The discomfort and pain caused by poor posture can create a vicious cycle. When your neck is tense and your head is pounding, you might find yourself adopting even worse postures in an attempt to find relief. This, in turn, exacerbates the problem and can lead to more muscle tension and strain. This cycle will continue until you break it!

So, How Do You Break the Cycle?

Now that we've established the connection between poor posture and neck pain/headaches, it's time to discuss how you can break this painful cycle! Here are three suggestions on how to break this cycle!

1. Change Your Setup:

Making sure that you have the RIGHT setup at your home or office desk is paramount to your success. Consider this a quick checklist for how to set up your office desk so you are less likely to put your neck into a compromised and strained position. Check yourself against the following list to see if you are set up optimally at your desk!

  • Get A Solid Chair:

    • The first step to achieving good desk posture is having the right chair. Look for a chair that provides support to your lower back (lumbar support) and is adjustable in height. Your feet should rest flat on the floor, or you can use a footrest to maintain proper leg alignment.

  • Feet Flat, Thighs Parallel:

    • Ensure your desk and chair work together seamlessly. When you sit down, your thighs should be parallel to the floor, and your feet should be flat or resting on the floor or a footrest. This alignment will help prevent strain on your lower back and legs.

  • Computer Monitor at Eye Level:

    • Position your computer monitor or screen at eye level. You shouldn't have to look down or up at the screen; it should be directly in front of you. This setup keeps your neck in a neutral position, reducing strain and discomfort.

  • Elbows Resting at 90 Degrees, Wrists Relaxed:

    • Your keyboard and mouse should be within easy reach, with your elbows close to your body and bent at a 90-degree angle. Your wrists should be in a neutral, flat position while typing. Avoid resting your wrists on the edge of the desk, as this can lead to wrist pain over time.

  • Sit Back and Relax:

    • Sit all the way back in your chair so that your back is supported by the chair's backrest. Maintain the natural curve of your lower back by utilizing the lumbar support feature. This helps to distribute the weight evenly and reduces the risk of lower back pain.

  • Shoulders Down, Not Up:

    • Keep your shoulders relaxed and down, not hunched up towards your ears. Avoid shrugging, as this can lead to tension in your neck and shoulders.

  • Schedule Breaks and Movement:

    • Even with perfect posture, it's important to take regular breaks. Stand up, stretch, and walk around for a few minutes every hour. This not only reduces the risk of muscle stiffness but also boosts productivity and concentration.

2. Three Exercises To Help Reduce Neck Pain and Headaches

After ensuring that your work environment is set up optimally, it is time to start dealing with some of the effects of our prior poor posture.

Below you will find a quick resource guide that you can use to reduce your neck pain and headaches today! Give these a try to see how they help reduce your stiffness and soreness.

Physio Exercise #1 - NECK MUSCLE KNOT RELEASE

Whenever you sit with poor posture, your body can go into a self protection mode. Your body will tighten muscles around the neck help protect it - thus developing neck muscle knots. This tightening of muscles will create stiffness, neck pain, and headaches.

In order to reduce your neck pain and headaches, you need to loosen these tightened neck muscles. We do this simply by using a lacrosse ball and rolling out the tightened muscles on the the back of the neck.

Equipment Needed: A lacrosse ball (or hard rubber ball) and a pillowcase

  • Step 1: Grab a lacrosse ball and place it in a pillow case.

  • Step 2: Find a solid wall (we do not recommend doing this on your feature wall in your living room incase you leave a dent in the wall!)

  • Step 3: Throw the pillowcase (with the ball in the bottom of it) over the back part of the neck and lean against the solid wall.

  • Step 4: Roll the ball around on the back until you find a sore spot (stay off the hard bony spine in the centre of the neck). Press into this sore spot so that it is tolerable but uncomfortable. Hold for 20-30 seconds before locating a new sore spot. Complete this for 4-5 minutes.

  • Step 5: Remove the ball from the pillowcase. Find a door frame and place the ball between your upper shoulder and the doorframe. Press into any sore spots so that it is tolerable but uncomfortable. Hold for 20-30 seconds before locating a new sore spot. Complete this for 4-5 minutes.

Once completed, this exercise should have removed some of the tension in the neck. This is the first physio exercise to reducing the pain you feel in your neck.

Physio Exercise #2 - HOW TO STRETCH THE NECK

Seated for hours at a laptop or your smartphone can lead to slouching and tension in your upper back and neck.  A physiotherapy exercise to help alleviate this is the neck muscle stretch. This exercise is most effective AFTER you have rolled out the tight spots in your neck with the Neck Muscle Knot Release exercise from above.

How to do this physio exercise:

  • Step 1: Turn your head and look at one of your shoulders.


  • Step 2: With the arm on the same side that you are looking, reach up and gently grab the back of your head.  


  • Step 3: Gently pull on the back of your head until you feel a gentle pull on the opposite side of the neck.  


  • Step 4: Hold for 20 seconds and relax.

  • Step 5: Repeat three times on both sides.


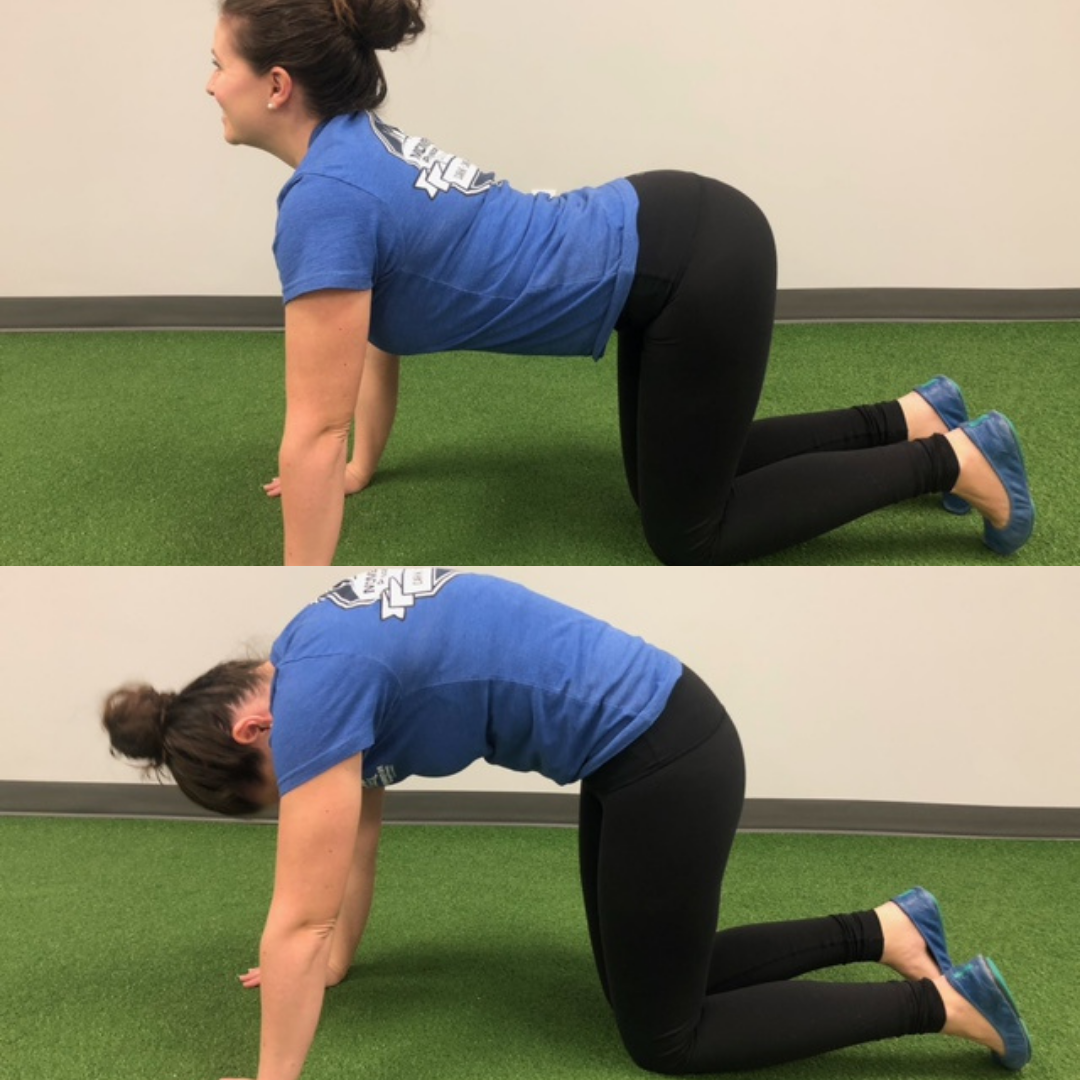
Physio Exercise #3: THE CAT COW

Once you have loosened the muscles of the neck, it is time to make sure that the bones and joints in the neck are moving smoothly. This next physiotherapy (and yoga!) exercise has been shown to loosen neck muscles and lubricate the joints in the spine. This is a go to for physiotherapists who are treating people with any form of back or neck pain.

How to do this physio exercise:

  • Step 1: From your hands and knees, start off by letting your stomach sink towards the ground while you look up towards the roof.  This is the cow position. 

  • Step 2: Go as far as you comfortably can and hold the end position for a count of 1.

  • Step 3: Arch your back up towards the roof while bending your neck down and looking towards your belly button.  This is the cat position.  

  • Step 4: Go as far as you comfortably can and hold the end position for a count of 1. 

  • Step 5: Repeat this 15 times.


Together, these three exercises are great ways to loosen tight neck knots, stretch shortened neck muscles, and lubricate the joints of the neck and spine. They are great exercises to help stave off or reduce neck pain and headaches.

3. GET HELP FROM A PHYSIOTHERAPIST

Dealing with chronic neck pain or frequent headaches can be incredibly frustrating and disruptive to your daily life. If changing your work setup and trying the simple exercises above don’t seem to cut it, before you reach for another painkiller, consider trying physiotherapy.

Assessment and Customized Treatment

The first step in a physiotherapy journey is a comprehensive assessment. A trained MOMENTUM physiotherapist will examine your posture, neck range of motion, and muscle strength. They'll also discuss your medical history and lifestyle factors. This information helps create a tailored treatment plan that's unique to you.

Your physiotherapist will create a customized treatment plant that will include:

  1. Hands On Physical Therapy: Physiotherapists use hands-on techniques to alleviate neck pain. These may include:

    • Joint Mobilization: Gentle movements to improve the mobility of your neck joints.

    • Soft Tissue Release: Techniques to relax tense muscles and reduce trigger points.

  2. Neck Exercises:

    One of the key components of physiotherapy for neck pain and headaches is targeted exercises. Your physiotherapist will guide you through exercises designed to:

    • Strengthen Neck Muscles: Strengthening these muscles helps support the weight of your head and maintain proper alignment.

    • Improve Range of Motion: Specific exercises can enhance the flexibility and mobility of your neck, reducing stiffness and discomfort.

    • Posture Correction: Physiotherapists can teach you techniques to maintain better posture, reducing strain on your neck and head.

  3. Pain Management

    Physiotherapy may also incorporate pain management strategies, such as heat or ice, electrical stimulation, cupping, or kinesiotaping to help alleviate pain and inflammation.

  4. Education

    A crucial aspect of physiotherapy is education. Your physiotherapist can provide guidance on ergonomics at work or home, helping you create an environment that supports good posture and reduces strain.

  5. Preventive Strategies

    Once your neck pain and headaches are under control, physiotherapy doesn't stop there. It equips you with tools and knowledge to prevent future issues. You'll learn how to maintain a healthy lifestyle, including exercises and habits that keep your neck and head pain-free.

Ultimately, physiotherapy is a natural approach to reducing your neck pain and headaches. Instead of relying on medications that may have side effects, physiotherapy aims to heal your body from within, addressing the underlying causes of pain.


So, what’s next?

If you’re looking to get back to feeling your best, consider trying physiotherapy!

If neck pain and headaches are interfering with your quality of life, its time to come in and visit us at MOMENTUM Physical Therapy in Okotoks. With a personalized approach that targets the root causes of your discomfort, physiotherapy can provide lasting relief, improve your overall well-being, and help you regain control over your life.

At MOMENTUM Physical Therapy, in Okotoks, we treat all kinds of pain. Our talented team of physical therapists and massage therapists have helped thousands of people with a wide range of pain and injuries. Reach out to us today at 403-982-5600 or online to book your appointment today!

So, here's your call to action: connect with a MOMENTUM physiotherapist today to get those hips feeling better! You'll be on the path to recovery in no time. Book online here!


Our award-winning team here at MOMENTUM Physical Therapy- in Okotoks, is ready to help! Give us a call today at 403-982-5600 to get booked in with one of our awesome physiotherapists, massage therapists, or trainers. Or feel free to book online HERE!

We’re here for you!


Frequently Asked Questions

Can physiotherapy help with neck pain?

Yes! Physiotherapy is an effective tool to help reduce your neck pain and improve your posture to prevent future episodes of neck pain.

Can physiotherapy help with headaches?

Yes! Physiotherapy is a powerful tool to treat and eliminate headaches. Your physiotherapist will help you learn what is causing your headaches and provide strategies on how to reduce and resolve your head pain.

How does physiotherapy help reduce neck pain and headaches?

Physiotherapists reduce neck pain and headaches by developing customized treatment plans that include hands on therapy and exercises to help people reduce neck pain, improve neck movement, and improve overall posture.

Meet our Registered physiotherapists:

Meet our Kinesiologists:

Momentum Physical Therapy, located in Okotoks, Alberta, is ‘Here for YOU’.


If you are experiencing neck pain, have recurring headaches, or you just want to learn more about how massage therapy and physiotherapy can help heal your pain, don’t delay and call MOMENTUM Physical Therapy today. You can reach registered physiotherapists and massage therapists at MOMENTUM, located in Okotoks, by calling 403-982-5600. We look forward to helping you feel you best again.

Pelvic Floor Physiotherapy

Pelvic Floor Physiotherapy

Have you heard of Pelvic Floor Physiotherapy before?  

Have you wondered what conditions are treated with Pelvic Floor Physiotherapy?

Maybe you have wondered if it might help YOU?

Hi, I’m Catherine Stoyles and I am a pelvic floor physical therapist at MOMENTUM Physical Therapy & Sports Rehab in Okotoks. 

To become a registered pelvic floor physiotherapist in Okotoks, AB, I had to complete a lot of education! First, I obtained my Bachelor of Social Science degree from the University of Ottawa before obtaining my Master of Science (Applied) in Physical Therapy degree from the McGill University in Quebec. I then later went through significant advanced training in order to become a registered pelvic floor physiotherapist!

Another fun fact is that I did the majority of my university schooling in French! So yes, I am completely bilingual and would be happy to conduct your appointments in English or French.


What is Pelvic Floor Physiotherapy?

Pelvic Floor Physiotherapy is a specialization within Physiotherapy that deals with issues of the pelvis, pelvic floor muscles, and pelvic organs. It considers factors that affect the pelvic floor from throughout the body such as posture, breathing, diet, stress, and more. Pelvic Floor Physiotherapists commonly treat women with pelvic floor concerns and some therapists specialize in treating men too.

As a specialization, Pelvic Floor Physiotherapy requires advanced training taken after completing a Physiotherapy degree. A Pelvic Floor Physiotherapist has knowledge of the pelvic floor muscles, nerves, organs, and connective tissues and is trained in performing external and internal assessments and treatments of these structures via the vagina and/or rectum.

  • urinary stress incontinence

  • urgency/frequent urination

  • painful intercourse

  • fecal/gas incontinence

  • pelvic organ prolapse

  • diastasis rectus abdominus (abdominal separation)

  • pregnancy related pain - pelvic girdle, back, rib, etc

  • postpartum recovery

A Pelvic Floor Physiotherapist uses education, hands on techniques, and home exercise programs to help prevent and treat pelvic floor dysfunction. Just as no two people, pelvic floors, or histories are the same, Pelvic Floor Physiotherapy treatment is personalized to each individual.

Some things that Pelvic Floor Physiotherapy should not be is painful or embarrassing. While some aspects of an assessment or treatment can be physically uncomfortable, it should not be painful. Sessions can be paused or adjusted as needed to make sure the experience is comfortable. Many of the topics that will be discussed in a Pelvic Floor Physiotherapy assessment and follow up treatments are also sensitive and people may find them difficult to discuss. However, it’s important to remember that a Pelvic Floor Physiotherapist regularly discusses taboo or private topics (and typically enjoys educating people about those hard-to-talk-about subjects) and will work with a patient to help them feel comfortable and listened to.


Why Is Our Pelvic Floor So Important?

The pelvic floor plays a vital role in health and wellness for women and men (yes, men have pelvic floors too!) The pelvic floor is made up of the muscles, nerves, blood vessels, and connective tissues that attach to the bottom of our pelvis and enclose the urethra, vagina, and rectum. The pelvic floor muscles work in combination with the abdominals, back, and hips.

The pelvic floor has various functions. It serves to control bladder and bowel movements as well as support the pelvic organs like the bladder, vagina, uterus, and intestines. The pelvic floors also play a role in sexual arousal and function. Pregnancy and delivery can put strain on the pelvic floor and good control of these muscles helps ensure a healthy and comfortable pregnancy and is an especially important consideration for vaginal births.

screen_2x.jpg

Outside of the more obvious roles, the pelvic floor is often overlooked but is it also important for general activity and sports. The pelvic floor is the base of the ‘core’ and is an important postural muscle group. Good pelvic floor strength and control allows us to build greater strength off of it. It also helps to manage the intra-abdominal pressure created when we lift, run, jump, etc. Over time, poorly managed intra-abdominal pressure can cause or exacerbate issues with incontinence, pelvic organ prolapse, and diastasis recti abdominis (abdominal separation).

Many of the hip muscles are also connected to the pelvic floor, either directly or functionally. For example, the obturator internis is a hip muscle that originates and forms the ‘wall’ of the pelvic floor and it is often involved in hip and leg pain. Because of the muscular, fascial, and nerve connections, the pelvic floor can be related to chronic hip and low back pain.


Learning how to control, strengthen, and relax the pelvic floor is important for everyone. It can help to ensure our digestion and elimination system functions smoothly. Plays a role in intimate relationships by aiding in sexual enjoyment and helping to keep sexual activities pain free. And good pelvic floor function allows us to be active by supporting our core during daily life as well as more physically challenging activities.


What Does A Pelvic Floor Physiotherapy Session Involve?

Pelvic floor physiotherapy assessments are done one-on-one in our private exam room. We start out with a detailed discussion about your current concerns and medical history. Many things can affect pelvic floor health including medical conditions, bladder and bowel habits, pregnancy, child birth, injuries, trauma, and even stress.

screen_2x.jpg

A physical exam is done to help confirm the root causes of your concerns. This may include assessments of general posture, hip mobility and strength, and abdominal function including DRA (diastasis recti abdominis) testing. Direct examination of the pelvic floor is also important and can be done externally and internally.

An internal pelvic exam is typically recommended as it allows direct assess of tissue health, pelvic floor muscle strength and tone, trigger points (muscle knots), scar mobility and sensitivity, and joint movement. The internal exam is done by inserting one or two gloved fingers into the vaginal and/or rectal openings. You are draped/covered throughout the exam and different positions can be used to ensure you are comfortable. When necessary, treatment techniques such as trigger point muscle release, scar massage, and joint mobilizations can be done internally. We can also teach pelvic floor muscle strengthening exercises during an internal exam and make sure they are done correctly.

Throughout all stages of a Pelvic Floor Physiotherapy session you can expect to be told what needs to happen, when, and why and can consent or say no to any aspect. We will also educate you on what is happening with your body and pelvic floor and answer any questions you have.

The final aspect of a Pelvic Floor Physiotherapy session is a personalized home management program that typically includes self treatments, breathing exercises, stretches, and exercises for the pelvic floor and whole body.


3 Physiotherapy Based Strategies to Engage the Pelvic Floor

Learning to engage the pelvic floor is important for everyone. Good pelvic floor control and strength is vital for our health and overall strength and stability. The pelvic floor controls the bladder and bowel movements, plays a role in sexual function, and it forms the base of our ‘core’ allowing us to move and function pain free.

There are different ways we can connect to and engage the pelvic floor. You can practice all three or choose the one that feels right and works the best for you.

Remember that relaxing the pelvic floor is just as important as contracting it. Whenever you are working on engaging or strengthening the pelvic floor, make sure you relax the muscles completely afterwards. A tight and short pelvic floor can result in issues like incontinence and pain.

Physiotherapy for tennis elbow.
  1. Diaphragmatic Breathing

Our breath is a key component in learning how to connect to and engage the pelvic floor. The pelvic floor is more of a hammock than solid ground and it naturally moves with our breath. It mirrors the movement of the diaphragm. As we breath in, the diaphragm contracts and flattens downward and pelvic floor gently expands and lowers, as we breathe out, the diaphragm relaxes the pelvic floor rises up and inward.

To take advantage of this natural movement and engage the pelvic floor, start by lying or sitting somewhere comfortable without many distractions. Take a deep breath into your belly and feel both your belly and pelvic floor expand. As you exhale, feel the belly empty and the pelvic floor draw back in. Breathe in deeply again and feel the belly and pelvic floor expand and on your next exhale use the pelvic floor muscles to gently squeeze and close around your urethra, vagina, and rectum. As you inhale again, relax completely and feel the pelvic floor expand.

Key tip: Make sure you aren’t actively pushing down through the pelvic floor when you inhale. Simply let the breath move it gently.

Physiotherapy for TMJ pain.

2. Visualization

Visualization is a powerful tool used by athletes to optimize movements and engaging the pelvic floor is no different. This can be a challenging strategy to use if you aren’t familiar with what the pelvic floor looks like so familiarizing yourself with the anatomy is very helpful. The pelvic floor muscles form a hammock from the front of the pubic bone to our ‘sits’ bones along the sides and back to the coccyx or ‘tailbone’. The urethra, vaginal opening, and rectum are lined up along the centre of the hammock.

To use visualization to engage the pelvic floor, sit or lay somewhere comfortable without many distractions. Imagine there is a marble (or tampon, etc) at the opening of the vagina. Inhale to relax and prepare and as you exhale try to draw the marble inwards and upwards behind the pubic bone. Inhale and relax the muscles completely.

Physio for hip pain and osteoarthritis.

3. Glute Contraction

The glute or buttock muscles are closely related to the pelvic floor and by strongly contracting the glutes we can get ‘co-contraction’ of the pelvic floor. We can also work on engaging the pelvic floor actively as we contract the glutes. Any glute strengthening exercise such as squats, donkey kicks, or deadlifts can co-contract the pelvic floor but bridges are a great place to start to more easily feel the activation.

To engage your pelvic floor by doing a bridge start by laying on the ground on your back. Bend your knees and plant your feet hip width apart near your buttock (grazing your heels with your fingertips can help make sure your feet are close enough). Inhale to relax and prepare and as you exhale, squeeze your glutes and lift your hips. Try to create a straight line angling from your shoulders to your knees. Inhale and lower your hips back to the ground, relaxing the glutes and the pelvic floor completely.


How Do I Know If I Have Diastasis Recti?

Diastasis Recti or Diastasis Recti Abdominis (DRA), also referred to as an abdominal separation, occurs when the tissue along the centre of the abdomen stretches leaving a gap between the two sides of the abdominal muscles. It can result in reduced support and strength. It occurs commonly with pregnancy but can also be caused by excess abdominal weight or repetitive abdominal loading activities. A DRA may be noticeable in standing as a bulging abdomen or central indentation but not always.

A physiotherapist doing IMS/Dry Needling (Intramuscular Stimulation).

To test yourself for a DRA follow these steps:

  • lay on your back with your knees bent and feet planted on the ground

  • use your fingers to press into the centre line of your abdomen at three points,

  • between your pubic bone and bellybutton

  • just above your belly button

  • between your belly button and rib cage

  • lift your head and shoulders off the ground and feel for the space between the muscles at each point

  • make note of how many fingers apart the muscle wall is as well as how deep your fingers press into the belly

A gap of more than a couple fingers, or more importantly, being able to press easily or deeply into the belly with little resistance (even with only one or two fingers) suggests you may have a DRA. A Physiotherapist trained in management of a DRA can help you confirm if you have one and guide you in resolving it.

For some women who develop a DRA during pregnancy, it will resolve on its own over time after the baby is delivered. However, for other women a DRA can persist indefinitely if not addressed. Specific, progressive exercises as well as postural changes, movement training, and breathing strategies can help to reduce or eliminate a DRA. Rarely, surgery is needed if a DRA is significant and does not improve with exercises and conservative management.


What Is Pelvic Organ Prolapse?

Pelvic Organ Prolapse (POP) refers to a loss of support of a pelvic organ. Different terms are sometimes used for POP depending on what organ is involved.

  • Urethrocele: the urethra (passageway for urine) sitting lower along the top of the vaginal canal

  • Rectocele: the rectum pressing down though the anus

  • Enterocele: the small intestine pressing down into the vaginal canal

  • Uterine prolapse: the uterus pressing down into the vaginal canal

  • Vaginal vault prolapse: top of the vagina pressing down into itself, sometimes seen after a hysterectomy (surgical removal of the uterus)

POP can vary in the degree of movement downwards and may be referred to by different grades.

POP can be asymptomatic or cause feelings of pressure or heaviness in the vagina. Symptoms may be felt all the time or only with certain activities. With more progressed POP, tissue may be seen at or past the opening of the vagina. Women may commonly experience urinary incontinence, difficulty emptying bowels, and other symptoms of pelvic floor dysfunction along with POP.

There are various risk factors for developing POP which include:

  • pregnancy

  • vaginal deliveries

  • chronic constipation and straining

  • respiratory issues with long-term cough

  • genetic factors

  • increased age

  • hysterectomy

  • repetitive heavy loading or high impact activities

  • obesity

Conservative management is the first line approach for all types of POP. Exercises and lifestyle modifications can increase support for the pelvic organs and reduce strain on the pelvic floor which can improve symptoms and sometimes the degree of POP. A pessary is a device worn inside the vagina that can provide support for the pelvic organs and can also be helpful for some women with POP. Some women may need surgery to correct POP but this is typically done as a last resort and conservative management techniques are still helpful to compliment a surgical correction.

Let’s Get Started

At MOMENTUM Physical Therapy & Sports Rehab in Okotoks, we care about you!

If you are dealing with any pelvic floor concerns, I would be happy to talk with you to determine if pelvic floor physiotherapy would be of benefit to your recovery.  

Momentum Physical Therapy in Okotoks

Call us today at 403-982-5600 to book an appointment with me, Catherine Stoyles, pelvic floor physiotherapist.

Not sure if you are need to see a pelvic floor phyio but would like more information, email me. I would be happy to answer any further questions you might have.

MOMENTUM Physical Therapy… we’re here for YOU!


Frequently Asked Questions - Pelvic Floor Physio

Can Pelvic Floor Physio help with painful sex/intercourse?

Yes! Pelvic Floor Physiotherapy can treat pain with sexual activity and intercourse. There are many different factors that can contribute to this type of pain including overactive pelvic floor muscles, muscle trigger points, scar immobility and sensitivity, hormonal changes related to pregnancy, postpartum, or menopause, and certain medical conditions. Oftentimes there are a combination of factors influencing painful sexual activity. Pelvic Floor Physiotherapy can identify the different factors contributing to the pain and can treat them as well as refer to the woman’s doctor where appropriate.

Will I ever be able to sneeze or laugh without worrying about peeing my pants?

Yes! Stress incontinence, the leakage of small or large amounts of urine with physical movement or activity, is common in women but it isn’t normal. Pelvic Floor Physiotherapy can identify and treat the various causes of stress incontinence. Treatment typically involves hands on treatments as well as a personalized home exercise program. It is possible to sneeze, laugh, run, and even jump on a trampoline without leaking urine!

Should I do ‘Kegels'?

Maybe. ‘Kegels' are a common name for exercises to strengthen the pelvic floor muscles. In the past, ‘Kegels’ were typically prescribed with a high number of repetitions and intensity. However, pelvic floor strengthening, especially at a high intensity, is not always appropriate. Many symptoms of pelvic floor dysfunction, including urinary stress incontinence/leakage, can be caused by overactive pelvic floor muscles. Performing ‘Kegels’ or any pelvic floor strengthening without knowing the state of the pelvic floor muscles may not help symptoms or could even make the issue worse. Connecting with and engaging the pelvic floor along with full relaxation afterwards is a better place to start. Getting a Pelvic Floor Physiotherapy assessment to receive a personalized program will also make sure you are doing the right exercises for your body and pelvic floor.

What does Pelvic Organ Prolapse mean?

Pelvic Organ Prolapse (POP) refers to a loss of support of a pelvic organ, like the bladder, uterus, or small intestine, causing it to drop down from its typical position. POP can be asymptomatic or cause feelings of pressure or heaviness in the vagina. Pregnancy and vaginal deliveries are common causes for POP but there are other risk factors for developing it as well including chronic constipation and straining, respiratory issues with long-term cough, genetic factors, age, hysterectomy, repetitive heavy loading or high impact activities, and obesity. POP can vary in degrees but in most cases can be managed conservatively with exercises, lifestyle modifications, and pessaries as needed. Some women may need surgery to correct POP but this is typically done as a last resort and conservative management techniques are still helpful to compliment a surgical correction.

Should I wear a pregnancy support belt?

Maybe. Pregnancy support belts are stretchy but supportive devices worn around the hips and/or belly to support the pelvis and abdomen during pregnancy. They may be helpful for some women who experience pain during pregnancy. There are many different factors that can cause pain in the pelvis, hips, back, and belly during pregnancy. Some of these factors include stress, diet, and nervous system sensitization which may not be helped by a belt. Seeing a Pelvic Floor Physiotherapist can help determine if a pregnancy support belt is right for you.

Do I need Pelvic Floor Physiotherapy if I’ve had a C-section?

Yes! Vaginal deliveries are not the only thing that put strain on the pelvic floor. Months of carrying a baby (while pregnant and afterwards), hormone changes during pregnancy and postpartum, postural changes, and more can all affect the pelvic floor. A Pelvic Floor Physiotherapist can also help with scar management and returning to physical activity after a c-section.


Momentum Physical Therapy, located in Okotoks, Alberta, is ‘Here for YOU’.

If you are experiencing any pain or injury, or you just want to learn more about how pelvic floor physio can help heal your pain, don’t delay and call Momentum Physical Therapy today. You can reach a registered physiotherapist at Momentum by calling 403-982-5600. We look forward to helping you feel you best again.